Saturday, December 11, 2010

How to Send Large Files Through Email

There are so many free email services that allow us to send files as attachments. But they have restriction on the size of attachments.

Zeta  Uploader is a free service which allows you to send large files through email to multiple recipients.

You can send up to 500MB sized attachments using Zeta Uploader which is a free of charge desktop uploader.

There are other settings available for the email like it will inform you about the expiry in days etc.


screenshot-01

We can set to expire the file download either in number of days or number of downloads.

In case the file needs protection, password can be put. If you want the service can notify you when the file is downloaded by the recipient.

You also get an online account where you can track all your files. There is no need to sign up for an account. The application creates it automatically as soon as you start using it. It is a simple way to transmit data to multiple recipients without worrying about the attachment limitations imposed by webmail services.

Zeta Uploader is a nice way to send large files upto 500MB in size.

Download Zeta Uploader

http://www.zeta-uploader.com/en/download

Thursday, December 9, 2010

How to find useful Google Chrome Extensions for Blogging


Google Chrome is getting more and more popular and the best part of Chrome is that Like Firefox, it now supports extensions as well. Well Firefox is an old Fox and has  thousands extensions,but Chrome is catching up and now there are quite a few very useful extensions. I am giving top 10 Google Chrome extensions for bloggers.

Stumble Upon : If you have used IE then probably you are aware of what this is. Stumble Upon helps you discover great websites that match your interests. Simply click the Stumble button and see the best websites.

Adblock:  Aah you know what it is. Its been there with Firefox for ages. For new ones, it block all advertisements on all web pages

 Docs PDF/PowerPoint Viewer: With this you can Automatically previews PDFs, PPTs, and other documents in Google Docs Viewer.

Tab Menu: Select, close, rearrange, and so much more possible with this one. A very useful extension for users with lots of tabs open.

 Facebook for Google Chrome: This is an unofficial extension. It lets you read your Facebook news feed and wall. By clicking on your profile picture.You can also update your status

 ChromeMilk: A Remember the Milk extension for Google Chrome, ChromeMilk lets you access your tasks right from your Chrome toolbar.

Chromed Bird: This is a Twitter extension with lots of features.

 Google Mail Checker Plus: As the name suggest.

Google Wave Notifier: It will Displays number of unread Waves in your Google Wave account or your Google Apps Wave account.

 Google Reader Notifier: Displays the Google Reader unread count. Clicking the icon shows a preview of your reading list in a popup.


 Aviary Screen Capture: It takes a screen shot of webpage and then you can edit it directly in Chrome with Aviary.com applications. It gives you convenient access to the Aviary website and its tools.

 Sessions Manager:  It lets you save sessions of your opened tabs and windows, and to quickly re-open them whenever you like.

 Multi-URL Shortener/Expander: It facilitate the use of URL shortening services.

 Web of Trust (WOT): It  warns you about risky sites that can’t be trusted. basically a safety tool.

Speed Tracer: It help you identify and fix performance problems in your web applications. It visualizes metrics that are taken from low level instrumentation points inside of the browser and analyzes them as your application runs.

Tuesday, December 7, 2010

How to create Glass Effect in Photoshop

This is step by step tutorial on how to apply blending styles on simple text, for converting it into a glass effect using Photoshop CS34/5

image 1 thumb [Tutorial] How to create Glass Effect in Photoshop?

  • Create a new file of size 500 x 400 pixels,
  • and select a background image similar to the image shown below, as it is more effective than solid or any other types of images.
  • Now create a text layer, and write your text (Press shortcut key T to create a new text layer).
  • You can select font size and font family of your choice, (here Rockwell is used as a font family and it is set to font-size 120px.)

image 21 thumb [Tutorial] How to create Glass Effect in Photoshop? image 31 thumb1 [Tutorial] How to create Glass Effect in Photoshop?

  • Select the option for blending in the layer palette to apply styles to your text.

image 4 thumb [Tutorial] How to create Glass Effect in Photoshop?

  • Now we have to select 5 different styles to get the desired effect.
  • see and select the parameters exactly as shown in the  images below.
  • Start with the Drop Shadow.

image 5 thumb [Tutorial] How to create Glass Effect in Photoshop?

  • Now set the Inner Glow style as shown in the image below.

image 6 thumb [Tutorial] How to create Glass Effect in Photoshop?

  • Set the parameters for Bevel and Emboss.

image 7 thumb [Tutorial] How to create Glass Effect in Photoshop?

  • Set Satin as shown in the image.

image 8 thumb [Tutorial] How to create Glass Effect in Photoshop?

  • Set Stroke of size 1, and set the color #959595.

image 9 thumb [Tutorial] How to create Glass Effect in Photoshop?

  • After applying the above blending styles, it should look something like this.
  • Now the last step.

image 10 thumb1 [Tutorial] How to create Glass Effect in Photoshop?

  • On reducing the fill value to ‘0’ from your layer palate we are done with the glass effect!

image 11 thumb [Tutorial] How to create Glass Effect in Photoshop?

  • As only blending styles is applied to the text,  the text can be changed as desired.

The final image will be as below:…

image 12 thumb [Tutorial] How to create Glass Effect in Photoshop?

Monday, December 6, 2010

How To Quickly Change Windows Live Messenger Status from Windows 7 Taskbar


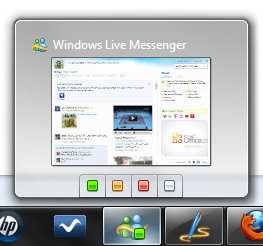
Windows Live Messenger 2011 which was released months back had some awesome features and social networking features including the Face book Chat feature available in Live Messenger 2011. Windows Live Messenger also has the ability to change the status directly from the Windows 7 taskbar.

Windows 7 taskbar status

To change the Live Messenger status without opening Messenger 2011, hover on the taskbar icon and you can see the preview of Windows Live Messenger 2011. In the preview window, you can see four buttons available for your current status- Available, Away, Busy and Invisible.

Once you change the status, you can see the icon for Windows Live Messenger 2011 on the Windows 7 taskbar also changes.


How to Use 20 Keyboard Shortcuts in windows 7


1. Win+1, 2, 3, 4, etc. will launch each program in your taskbar. It is helpful then to keep your most used programs at the beginning of your task bar so you can open them one right after another. This also works in Windows Vista for the quick launch icons. So you can launch all the programs which are in your taskbar from keyboard itself. just press windows key with the serial number of that program in taskbar. For example in the picture below, google chrome is number 2 in the task bar that means Windows key + 2 will launch Google Chrome.

2. Win+T will cycle through taskbar programs. This is similar to just hovering over the item with your mouse but you can launch the program with Space or Enter. That means press Windows key along with T will keep shown these views of the programs in the task bar.

3. Win+Home minimizes all programs except current the window. This is similar to the Aero shake and can be disabled with the same registry key. Easy enough to understand. Some expert says it helps to keep the RAM consumption down if we minimize all other program other the one we are working on.

4. Win+B selects the system tray which isn’t always useful but can come in very handy if your mouse stops working.

5. Win+Up/Down maximizes and restores down the current window so long as that window has the option to be maximized. It is exactly the same as clicking on the middle button on your windows. So next time you want to minimise or maximise a windows you are working on, don’t rush for mouse. just press Windows key +up/down key and you are there.

6. Alt+Esc is like Alt+Tab but switches windows in the order they were opened and does not have the fancy window preview overlay. Just check it, its nice effect.

7. Win+Pause/Break will open your system properties window. This can be helpful if you need to see the name of a computer or simple system statistics.

8. Ctrl+Esc can be used to open the start menu. It will be same as if you press Windows key to open the start menu. But it will not work as a Windows key replacement for other shortcuts.

9. Ctrl+Shift+Esc will open the task manager without needing to hit Ctrl+Alt+Del first.

10. Alt+Space will open the window system menu which can be used to maximize (x), minimize (n), close (c), or move (m) the window which can be especially helpful if your window is somehow off-screen. This shortcut can also be helpful with windows that don’t close with the Alt+F4 shortcut such as the command window.

Windows Explorer Shortcuts

11. Alt+Up will navigate up one folder level since the up arrow on the menu bar was removed in Windows Vista. Alternatively, you can also make Backspace go up one folder level with a handy AutoHotKey script.

12. Shift+Del deletes a file without sending it to the recycle bin because who wants to empty their recycle bin anyway?

13. Ctrl+Shift+N creates a new folder in your current directory.

14. Alt+Enter opens the file properties so you can view file size, sharing settings, and creation date.

15. F2 renames a file or folder.

16. F3 will open explorer and select the search bar. If you already have an explorer window open it will highlight the search bar. In some programs it will also open the search dialog to search within that program.


17. F6 cycles objects in the current window. In explorer this will cycle between the location bar, options bar, left pane, and right pane. It also works with varying success in other programs.

18. F10 toggles the file menu in explorer.

19. Win+Alt+1, 2, 3, etc. will open the jump list for each program in the taskbar. You can then use your arrows to select which jump list option you want to open.

20. Shift+F10 opens the contextual or “right click” menu for a file/folder. This can be very handy for speed especially if you know which option you want to select. Look for an underlined letter in each option to know which letter you can press for faster access.

How to Split and Join MP3 Files


MP3 Splitter Joiner is a freeware tool which helps you to split MP3 files and also join multiple files to make a single MP3 file. The application comes with an easy to use interface which allows you to add any number of MP3 files from your PC. You can also drag and drop files to the interface. You can specify the part of the MP3 file which you want to split and then do the processing.

clip_image001

Other settings are easily managed by the options window.

clip_image002

Features of MP3 Splitter and Joiner;

§ MP3 Joiner Splitter is a FREE mp3 splitter and joiner.

§ Split MP3 files into sections by length, size and count.

§ Cut used-defined section.

§ Copy audio tag during the splitting process.

§ Join and merge MP3 files into one big file.

§ Support batch splitting and joining.

§ Incredibly fast and fully optimized for multiprocessor/multi-core systems.

§ On-the-fly processing, no temporary file generated.

§ Windows Explorer-Style user interface, very easy to use.

§ Support drag & drop.

§ Search, add and manage the files to split and join with ease.

§ Build-in latest Lame MP3 encoder which is generally believed as the the best MP3 encoder

Download MP3 Splitter Joiner

Remove Background from any Image with Picture Cutout

image

We have seen the background removal tool available in Office 2010. Picture Cutout Lite is a simple and freeware tool which allows you to easily remove backgrounds from any image by specifying the objects you want to retain in the image. The application offers a tool called Wide Edge which allows you to separate an object from its background and to store it for later transfer to another photo and applies background effects.


The lite version of the tool is completely free of cost. We tried the tool and used it to erase a background image and the results are really good. Once you have made the changes, you can save the images to your PC. When you remove the background from image, you can add a plain color background which can be specified when applying the results.

The application comes with tutorials on how to use it to remove backgrounds. Picture Cutout Lite is very useful tool and worth downloading.

Download Picture Cutout Lite