Tuesday, November 17, 2009

How to Test Your Antivirus ?

Your Antivirus is a very important software on your system. Never ever visit big bad world of Internet without an antivirus on your computer. But is your antivirus working fine ?? How to find out ?

There are many sites which let you check your antivirus. But you can test it yourself

1. Open Notepad.

2. Copy paste the following

X5O!P%@AP[4\PZX54(P^)7CC)7}$EICAR-STANDARD-ANTIVIRUS-TEST-FILE!$H+H*


3. Save it as fakevirus.exe

4. Your antivirus should immediately catch and delete it. If not then its time you change your antivirus.

Monday, November 16, 2009

How to Download from Rapidshare with waiting

If you want to download something from Rapidshare free account, then you have to wait between the two downloads. It is frustrating when you want to download a file which has more than one piece. But the workaround is very simple.

It will work if you have a dynamic connection. Generally internet provided by telephone companies like bsnl broadband are dynamic connection. It means your IP address is not fixed and it keep changing whenever you connect and disconnect. This feature is useful, as Rapidshare knows you by your IP address only.

All you have to do is after a download completes, switch off your modem and switch is on again after 10 seconds. When you connect to internet your IP address will change and Rapidshare will allow you to download the next file, because it will take you as a new computer.

Thursday, November 5, 2009

How to change the Product Key in Windows XP

In order to change a Product Key you must have a valid copy of Microsoft Windows XP and a valid Product Key.

Steps

Open Internet Explorer (other browser won't work on this. Thanks Billy)

The first step is to go to the Genuine Microsoft Software self-help page, Update Your Product Key: Select Your Version of Windows.(You will have choice of XP, Vista and maybe Windows 7)

Select the Windows XP button to get to the Web page 

Carefully read this page. Microsoft suggests creating a restore point, which you must do, before making changes to your Windows XP installation. Note the gentle warning about sending information to Microsoft so the system can verify the validity of your operating system.

Assuming all of that is OK with you, click the I Understand check box and then click the Download button. You’ll see the typical Run, Save, or Cancel dialog

Select Run, Save, or Cancel.

The rest of the process is your basic follow-the-wizard instructions you should be intimately familiar with by now. Click Run

Yes, I am sure.

Confirm you want to run the applet and start the wizard

tart the wizard.

Click Next, and you will finally reach the screen (Figure F) where you will enter your new Product Key.

Enter the new Product Key.

When you are finished, click Next and then Finished on the next screen to restart Windows. Once Windows is running again, you will need to go through the standard activation procedure to complete the change of Product Key process.

Tricks for 3D Pinball in Windows XP

Games in Windows XP such as Solitaire, FreeCell, and Minesweeper are nice distractions — nothing blows off steam like a good round of 3D Pinball for Windows, especially in full screen mode with the volume cranked all the way up!

3D Pinball for Windows has nine rank levels, ranging from Cadet to Fleet Admiral. Complete each mission and advance to the next rank, but you go back to Cadet at the beginning of each game. Here are a few secret codes to get more enjoyment out of 3D Pinball. Note that the 3D Pinball window must be active for these codes to work.
Regain your old rank from a previous game by starting a new game and immediately typing rmax. Each time you type this secret command, you’ll advance one rank level.
Get an extra ball while the Awaiting Deployment message displays by typing 1max.
Activate the Gravity Well by starting a new game and immediately typing gmax.
Get an unlimited number of balls and essentially play for as long as you like by starting a new game and immediately typing bmax. Each time you lose a ball, a new one will appear. (While playing with an unlimited number of balls, none of the other tricks will work.)
Control the ball with your mouse by starting a new game and immediately typing hidden test. When you do, you can click the ball with your left mouse button and essentially drag it anywhere you want and rack up an unbelievable number of points.

Keep in mind that there isn’t a text box into which you enter these secret codes — you simply type them.

Note: This tip applies to both Windows XP Home and Windows XP Professional.

How to Customize Windows XP's General tab

It’s easy to customize Windows XP’s General tab in the System Properties dialog box with your support contact information and your company’s logo or personal logo by using Notepad. 

1. Launch Notepad and type the following text, replacing the dummy information shown here with your own: 

[General]
Manufacturer=Pradeep's Computers
Model=1234567
[Support Information]
Line1=Call 123-12345 for technical support
Line2=Call 123-12345 for technical support
Line3=Call 123-12345 for technical support
Line4=Call 123-12345 for technical support
Save the file in the C:\Windows\System32 folder as Oeminfo.ini.
To add your logo to the General tab, create a 256-color BMP file that is 96 by 96 pixels in size.
SSave the file in the C:\Windows\System32 folder as Oemlogo.bmp.

After you create the files, you can check the results immediately by pressing [Windows][Break]. This will quickly bring up the System Properties dialog box.

Note: This tip applies to Windows XP Home and Windows XP Professional.

How to speed up defrag operations in Windows XP

1.   The most simple way to speed up a defrag operation in Microsoft Windows XP is to restart the system before you launch the Defrag application. This allows the operating system to clear out the swap/paging file (may require a change in configuration for ultimate effect) and to reset it to the default size. This lets Defrag focus strictly on the necessary data on the hard disk, without having to stop and manage a huge swap file loaded with unneeded data.

2.   Another approach to speeding up a defrag operation in Windows XP is to configure it to occur immediately upon startup. You can do so easily with a simple registry edit.

Note: Before editing the Windows Registry   back up your Windows Registry. 

Follow these steps to start a defrag operation immediately upon startup:

Launch the Registry Editor (Regedit.exe).

Go to: 

HKEY_LOCAL_MACHINE\SOFTWARE\Microsoft\Windows\CurrentVersion\RunOnce
Right-click the RunOnce subkey and select New | String Value.
Name the value Defrag and press [Enter] twice.
Type Defrag.exe c: /f in the Value Data text box and click OK.
Close the Registry Editor and restart Windows.

The defrag operation will begin when you type your password and press [Enter]. (Keep in mind that values added to the RunOnce key are removed immediately after the command has been run.)

Note: This applies to both Windows XP Home and Professional editions.

Thursday, August 20, 2009

How to enable and disable hibernation in Windows 7

When enabled, the size of the hibernation file (hiberfil.sys) will be the same as the amount of installed RAM on your computer

You can set your computer to either use or not use the Hybrid or Hibernate sleep mode option from the Advanced Power Plan Options.

METHOD-1  THROUGH COMMAND PROMPT


Only using this method to disable hibernation will delete the hiberfil.sys file.

1. Open a Elevated Command Prompt.

2. TO ENABLE HIBERNATE

A) In the elevated command prompt, type powercfg -h on and press Enter.  

B) Now set your Power Plan settings to the recommended settings for Hibernate

C) Go to step 4.

3. To Disable Hibernate -

A) In the elevated command prompt, type powercfg -h off and press Enter.

METHOD-2  THROUGH POWER OPTION

1. Open Power Options to change the advanced power settings, and expand Sleep and Hibernate after.

2. To Disable Hibernate -

A) Under Hibernate after, set the Setting (Minutes) to Never. (See screenshot above)

B) Under Allow hybrid sleep, set Setting to Off.

C) Click on OK.

3. To Enable Hibernate -

A) Set the Setting (Minutes) to how many minutes your computer is inactive for before hibernating, then click on OK.


How to prevent unwanted automatic wakeup from sleep in Windows 7

I was plagued with this problem for long. Every time I put my shiny new computer with Windows 7 RC to sleep, it will wake up automatically after some time. Now this was very annoying as I am on an Internet plan which allows me unlimited download between 2 am to 8 am. So I have automated this process so that my computer wakes up at 2 am and goes back to sleep at 8 am. This way I was saving on electricity bill and some component life too. But though I liked windows 7 much more than my XP and Vista, I had to abandon it due to this problem. But then I found the solution and here it is:

Step -1 Right click on 'Computer' and select 'Properties'

Step -2 Select 'Device Manager'

Step -3 Expand 'Network Adapter'

Step -4 Uncheck 'Allow this device to wake the computer.'

Step -5 click 'ok' and close all the windows.

Step -6 You are done.


Monday, March 9, 2009

How to enable Hibernate Button in start menu

Ah. thats an easy one. Click Start-turnoff computer and you will get three options :

Stand By--Turn Off--Restart.

Now press the shift button and your Stand By button will turn into Hibernate, provided you have enabled hibernation.

But there are still few who dont like to touch keyboard. This is for them.

As usuall first of all backup your registry and in case anything goes wrong just restore it.

--------------------------------------------------------------------------------------------

Click Start, click Run, type regedit, and then click OK.

Locate and then click the following registry subkey: 

HKEY_LOCAL_MACHINE\SOFTWARE\Policies\Microsoft\Windows

Right-click Windows, point to New, and then click Key.

In the New Key #1 box, type System, and then press ENTER.

Right-click System, point to New, and then click Key.

In the New Key #1 box, type Shutdown, and then press ENTER.

On the Edit menu, point to New, and then click DWORD Value.

In the New Value # 1 box, type ShowHibernateButton, and then press ENTER.

Right-click ShowHibernateButton, and then click Modify.

In the Value data box, type 1, leave the default Hexadecimal option selected, and then click OK.

Quit Registry Editor.

-----------------------------------------------------------------------------------------------

Click Start, click Run, type regedit, and then click OK.

Locate and then click the following registry subkey: 

HKEY_LOCAL_MACHINE\SOFTWARE\Policies\Microsoft\Windows

Right-click Windows, point to New, and then click Key.

In the New Key #1 box, type System, and then press ENTER.

Right-click System, point to New, and then click Key.

In the New Key #1 box, type Shutdown, and then press ENTER.

On the Edit menu, point to New, and then click DWORD Value.

In the New Value # 1 box, type ShowHibernateButton, and then press ENTER.

Right-click ShowHibernateButton, and then click Modify.

In the Value data box, type 1, leave the default Hexadecimal option selected, and then click OK.

Quit Regedit.


Note If your computer is on a domain and if your computer uses the classic Shut Down menu, you must follow these steps to cause the Hibernate button to appear:

Click Start, click Run, type regedit, and then click OK.

Locate and then click the following registry subkey: 

HKEY_LOCAL_MACHINE\SOFTWARE\Policies\Microsoft\Windows

Right-click Windows, point to New, and then click Key.

In the New Key #1 box, type System, and then press ENTER.

Right-click System, point to New, and then click Key.

In the New Key #1 box, type Shutdown, and then press ENTER.

On the Edit menu, point to New, and then click DWORD Value.

In the New Value # 1 box, type HibernateAsDefault, and then press ENTER.

Right-click HibernateAsDefault, and then click Modify.

In the Value data box, type 1, leave the default Hexadecimal option selected, and then click OK.

Note After you set the HibernateAsDefault DWORD value to a non-zero value on a computer that is joined to a domain, Hibernate appears in the Shut Down Windows dialog box if the following conditions are true:

1. Hibernation is enabled on the computer.
2. No automatic updates are pending that require the computer to be restarted.


Quit Registry Editor.

Reboot and you are done.

Sunday, March 8, 2009

How to setup a system start password

You can increase the security of your computer by creating a password, called a startup key, to start your computer. For this we can use and inbuilt Syskey program to create the password that you will need to enter to start the computer.

Creating a password to start your computer makes it virtually impossible for an unauthorized user to log onto your computer. You will be required to first enter the startup password and then only the welcome screen will come up. So any hacker will not have the opportunity to hack your user account password because he will have to first crack the startup up password.

  1. You must be logged on to Windows as a computer administrator to use the Syskey program.
  2. Passwords are case sensitive. For example, if your password is 'godis1', you cannot
    enter 'GODis1' to start your computer.
  3. Click start-Run.


  1. Type syskey to start the Syskey program. Click OK.
  2. The Securing the Windows XP Account Database dialog box appears.
  3. ˇ Click Update to add additional security to your computer.
  4. The Startup Key dialog box appears.
  5. Click Password Startup to create a password you will enter to start your computer . check the radio button there.
  6. Fill the password carefully. (you will be required to do it twice.) for security you must choose a password which has atleast 12 characters and is a combination of letters, numbers, symbols and space. E.g. Asq 89 @#$ . Don't forget this passwords otherwise you wont be able to start your computer again.

  7. Click OK to continue.
  8. The success dialog box will appears and will state that the account database startup key was changed. Click Ok and close the program.
  9. When you start your computer next time a windows xp startup password dialog box will appear. You will be required to fill the password to start your computer.
  10. If you no longer want this security, you can stop Windows from requesting a password. Display the Startup Key dialog box byperforming steps 1 to 5. Click the "SystemGenerated Password" option and then choose the "StoreStartup Key Locally" option.uncheck the radio button there. Click OKto confirm your changes. In the dialog box that appears,type the password you enter to start your computer andthen press the Enter key twice.


Friday, February 27, 2009

How to remove autorun malware

I'm having a problem with one of our PC. When I try to open (double click) local C drive, I got a warning that Windows cannot find: 

""RECYCLER\S-8-9-94-100022539-100013076-100012326-629 6.com make sure you typed the name correctly,and then try again. to search for a file, click the start button, and then click search.""

This warning appears only on drive c/d/e etc..., when I try to open the drive it just won't open. However when i right click on the drive and select explore then the drive will open. Its probably a Malware or something? I hope somebody can help me on this. Many thanks.....

Sounds familiar. Well then your computer is infected with autorun virus. To remove it go to www.download.com and download a small utility called Autorun Eater. The moment you finish installing, the programme will start and will detect this virus. It will you give an option to remove it. Just do it and thats it.

This programme will remain in your system tray. It will take up very little memory which you can see under billy.exe.


Monday, February 16, 2009

How to Check your Antivirus Protection

Many a time we wonder if our antivirus is providing realtime protection to our computer.

To test your installation, copy the following line
X5O!P%@AP[4\PZX54(P^)7CC)7}$EICAR-STANDARD-ANTIVIRUS-TEST-FILE!$H+H*

open Notepad and paste this line.


Now try saving this file as EICAR.COM


The file size will be 68 or 70 bytes. As soon as you click save, your antivirus should catch this file as virus and deleve/quarantine it or atleast warn you about it. It it does, that means your antivirus is providing you with realtime protection.


If it does not. Then scan the directory in which you have saved this file.
Your antivirus if catches it, then it means your antivirus is working, though it may not be providing realtime protection in all conditions.
If your antivirus does not catch this file, then UNINSTALL that piece of garbage called antivirus,and get your money back from the vendor.

The antivirus industry, through the European Institute for Computer Antivirus Research, has adopted this standard to facilitate this need. Note that this file is NOT A VIRUS. Delete the file when you have finished testing your installation to avoid alarming unsuspecting users.

NOTES - The file is simply a text file of either 68 or 70 bytes that is a legitimate executable file called a COM file that can run by Microsoft operating systems and some work-alikes, including OS/2. When executed, will print "EICAR-STANDARD-ANTIVIRUS-TEST-FILE!" and stop. The test string was specifically engineered to consist of ASCII human-readable characters, easily created using a standard computer keyboard. It makes use of self-modifying code to work around technical issues that this constraint makes on the execution of the test string.

Tuesday, February 10, 2009

How to Speed up your uTorrent downloads

If you want to download anything from P2P networks, the best torrent client to use is uTorrent. It's heavy on features, and light on size, and its free.

Use the right port
This is a very a very important one. Using the right port number can increase the number of PCs that can connect to you, and thus speed up downloads. It's best to choose a port in the range- 49152-65535.
In uTorrent, go to Options -> Preferences -> Connection and enter in number from the above range, and save your changes.

To check if the port is forwarded properly, go to Options -> Speed Guide and click on the button “Test if port is forwarded properly”.

This will launch the uTorrent port checker webpage that will tell you if the port is open or not.

If the port is forwarded properly, then fine, but if it's not, then you need to do these:-

1. Open the Windows firewall from the control panel, and uncheck the "Don't allow exceptions". You don't have to bother about this if you don't use Windows' firewall. Or if you use a third party firewall, make sure that uTorrent is allowed proper net access.

2. Configure the router to forward the port automatically. There are many tutorials that deal with port forwarding on the net (and this forum itself) so search for them.

Set the proper upload limit

To find out the right number for this, visit Speedtest.net and conduct a speed test. Make sure that there are no applications running in the background which are connecting to the net. Conduct the test a few times and take the average upload speed. Click here and enter the value you got. Change the value in the drop down box to "kilobits". Click on calculate. In the table that appears below, note the value next to "Kilobytes". Multiply this value by 0.8 and you have your magic number. In uTorrent, go to Preferences -> Connection and enter in the new number for the Maximum Upload rate. Leave your download rate at “0? (maximum). Ok my personal experience is that set this upload limit to 15 kbps for Home 500 connection.

Change the bittorrent settings

In Options -> Preferences -> BitTorrent you’ll need to make some recommended modifications. Change the settings to make the dialog box look like this.

Enable encryption

In Options -> Preferences -> Advanced you’ll need to make a few adjustments, as well. Scroll down to where it says “net.max_halfopen” and change this from 8 to 50. (If you’re on a dialup Internet connection, don’t do this). Now, scroll up to “bt.connect_speed” and change the value from 20 to 50. Last, go to “diskio.flush_files” and be sure this is set to true. Click Apply and OK to save the changes.

After making these changes, you'll need to restart uTorrent. You'll notice that the speeds have increased substantially (unless you've done some of these tweaks before).

On my BSNL Home 500 connection (256 kbps- 2mbps), I am getting speeds up to 250 kbps and max up to 280 kbps. I can't get speeds above this because of my connection limit.
One byte is made of 8 bits. So when I am getting a speed of 250 kbps it is 250,000 x 8 = 2 Mbps which is the max my connection allows.

How to make Desktop icons transparent

If you have a shadow on your desktop icons and you don’t like it, then you can make your desktop icons transparent and remove this ugly shadow.
For this follow these steps
1. Right click on my computer icons and select Properties. In that select Advance Tab and click the Setting button in Performance heading.

Click visual effect tab in the Performance dialog.
1. Check the box titled “Use drop shadows for icon labels on the desktop”.1. Click ‘Apply’ and then click ‘OK’.
Its DONE.


Friday, February 6, 2009

How to Change the Product Key of Windows XP

I don’t want to know why you want to change the Windows XP product key. But if you do,
There are several ways to do so. Some of them are given below.

Note: You should create System Restore Point before proceeding. If something goes wrong, no need to worry, just restore your system.

To change your Windows XP product key, please follow the steps below:
Click Start, and then click Run.
1. In the Open box, type regedit, and then click OK.

2. In the left pane, locate and then click the following registry key:

HKEY_LOCAL_MACHINE\Software\Microsoft\WindowsNT\Current Version\WPAEvents

3. In the right pane, right-click OOBETimer, and then click Modify.

4. Change at least one digit of this value to deactivate Windows.

5. Click Start, and then click Run.

6. In the Open box, type the following command, and then click OK.

%systemroot%\system32\oobe\msoobe.exe /a

7. Click Yes, I want to telephone a customer service representative to activate Windows, and then click Next.

8. Click Change Product key.

9. Type the new product key in the New key boxes, and then click Update.If you are returned to the previous window, click Remind me later, and then restart the computer.

(When Windows reboots, your next step will depend on which Windows XP version you are using. If you have XP Home or Professional, you’ll be prompted to reactivate your copy of Windows through the normal activation process. If you have XP Corporate, no activation is required and your machine should have a valid product ID. You can verify this by running the %systemroot%\system32\oobe\msoobe.exe /a command again. When the wizard loads this time, you should see a message indicating that your copy of Windows has already been activated.)
10. Repeat steps 6 and 7 to verify that Windows is activated. You receive the following message:
Windows is already activated. Click OK to exit.

11. Click OK.

There are many softwares available which change the product key for Windows. You can google you way to download these.

Windows XP Product Key Modifier
The magical Jellybean Key Finder

Thursday, January 29, 2009

How to integrate SATA drivers in Windows XP CD


You required

1. The original Windows XP Installation CD,

2. a freeware application named NLite and a blank CD.

3. The drivers for the SATA controller provided by the manufacturer.

In case you did not find  any floppy inside the motherboard package or you cannot locate them on the mainboard installation CD, you can consult the manufacturer's website to download the latest versions.

4. A computer with Windows XP installed.

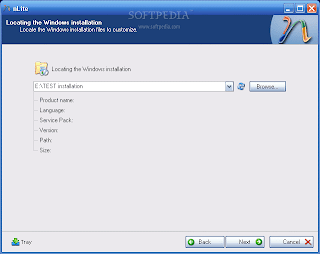
Download the drivers and unzip them (in case they come archived) in a folder name it 'driver'. Then download and install the Nlite application.

When you start the Nlite application, you will be asked to provide the location for the Windows installation package. Insert the genuine Windows Installation CD into the CD drive and, inside the application, select the CD drive letter. Make a folder 'xp sata' and direct the nlite to it. you win xp installation files will be copies in it by nlite.

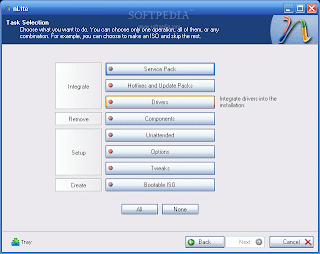
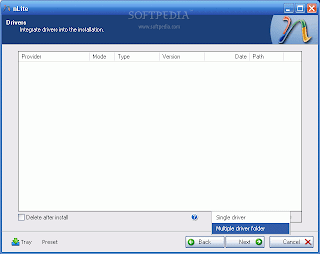
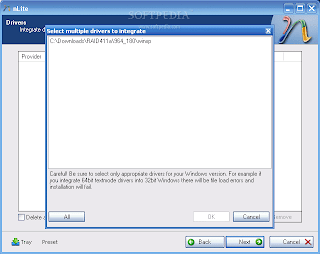
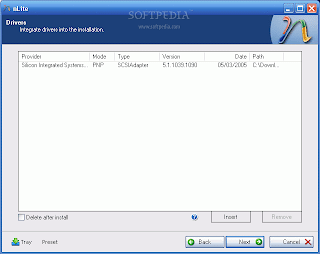
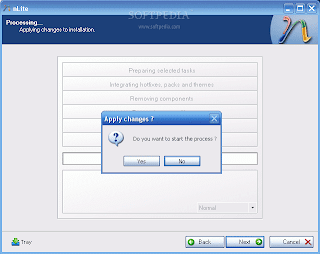
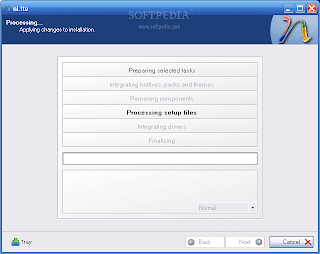
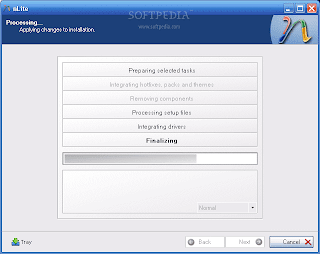
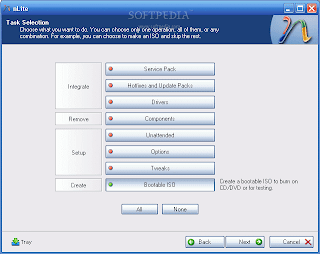
Now, click next until you get to a screen where you get options sorted in 4 categories: Integrate, Remove, Setup, Create. We are interested in the integration procedure, therefore select the Drivers button and click next. From the next menu window, click Insert and select multiple drive folder option from the drop down menu. This option permits you to browse to the location where the downloaded drivers are found. Select the containing directory and click next. You will get a list with the available drivers (in case there are more than one) or simply one driver. Select it (them) and click next. Now the application will ask for the permission to start the integration procedure. Choose Yes and wait for the drivers to be inserted into the installation package.

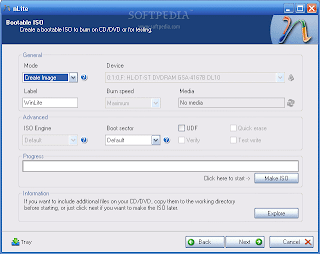
after that just clikc next next till you get the option of making ISO. make sure that the mode is set to "Create Image" and click Make ISO. A destination folder is required where the resulting ISO image will be saved. Once the image saving process finished you have the freedom to burn it on a blank CD with whatever you favorite CD burner software may be.

The new Windows XP will be ready with SATA drivers on it.


Wednesday, January 14, 2009

How to include Acronis True Image in Eazy Boot Menu

Step 1. Make Acronis ISO from Acronis Media Builder.

Step 2. Save this ISO as an ISO file with a name Acronis.iso(or which has 8 or less character).

Step 3. Copy it to ezboot folder.

Step 4. Make sure that bcdw.bin file is present in ezboot folder.

Step 5. In the Eazy Boot Menu, use the following command to launch the ISO :

Bcdw/ezboot/Acronis.ISO

Step 6. Make ISO and burn on CD. Its done.

Saturday, January 3, 2009

How To Make Windows XP Start 60% Faster

Making Windows XP Start 60% Faster

Code:
Whenever you start your computer, you are faced with a few moments of thumb twiddling while Windows XP boots and prompts you to log on. Although you should expect to wait for a few moments, sometimes Windows XP seems to boot rather slowly. In fact, you may notice that over a period of time the PC that used to roar to life seems a bit sluggish instead. Fortunately, you can perform several techniques that help Windows XP get the bootup speed you want. This chapter explores how to put these techniques to work.

Stopping Unneeded Startup Services

Along with the core operating system and programs that Windows XP runs when it starts, there is also a host of services involved. Many of these services are necessary for Windows XP to operate correctly. However, many of them are for features in Windows XP that you may not use at all. You can peruse the services and disable any service that you do not want to run. The fewer services that run, the more quickly Windows XP will boot.

Caution:
Exercise caution when stopping services. If you do not know what a service does or are unsure of the ramifications of stopping the service, leave it alone. Some services are critical to Windows XP's operations, so make sure you understand what the service is before you disable it.

To reduce the number of services that start on bootup, you can access two different areas of Windows XP. The first is the System Configuration Utility. The Services tab shows you the services that start when the computer boots.

You can stop a service from starting by simply clearing the check box next to the service and clicking OK. However, before you do so, there is another way to disable services that you may prefer because the interface gives you more information about the service in question.

Open Control Panel/Administrative ToolsServices or else select Start/Run, type services.msc, and click OK. Either way, you see the Services console.

I prefer to use the Services console instead of the System Configuration Utility because it describes what the service does. Additionally, you can double-click a service and
examine its properties.

Notice the Startup Type column in Figure 4-2. This information lists whether the service is automatic or manual. Manual services are only started in Windows XP when you start a process that requires the service. Some other process may require the service that has a "dependency" relationship with it; in this case, the dependency service will start, as well.

Because these services do not start automatically when you boot Windows XP, you do not need to do anything with manual services.

However, all services listed as automatic start when Windows XP boots. These are the services that increase boot time. As I have mentioned, many of them are necessary and important, so you should not stop automatic services from booting unless you are sure of the ramifications. You can get this information by looking at the Description column. Here's a quick look at common services you may want to live without:

Automatic Updates: This service enables Windows XP to check the Web automatically for updates. If you don't want to use Automatic Updates, you can disable the service. You can always check for updates manually at the Windows Update Web site.

Computer Browser: If your computer is not on a network, you don't need this service. If you are on a network, leave it alone.

DHCP Client: If you are not on a network, you do not need this service. If you are on a small workgroup, you can still increase boot time by configuring manual IP addresses (which I explore later in this chapter).

DNS Client: If you are not on a network, you do not need this service. If you are, leave it alone.

Error Reporting and Event Log: You don't have to use these services but they can be very helpful, so I would leave them configured as automatic.

Fax: If you don't use your computer for fax services, you can disable this one.

Help and Support: If you never use the Windows XP Help and Support Center (found on the Start menu), you can disable this service.

IMAPI CD-Burning COM: This service enables you to burn CDs on your computer. If you never burn CDs, you can disable the service.

Indexing Service: Your computer keeps an index of files but if you rarely search for files, the service is just a resource hog. You can stop it and turn the service to manual.

Windows Firewall/Internet Connection Sharing: If you do not use these features, you can disable them.
Infrared Monitor: If you do not use infrared devices, you can disable this service. Messenger: This service sends alert messages on a local area network (it is not the same
as Windows Messenger). If you are not on a network, you can disable this service.

Print Spooler: If you do not do any printing from the computer, you can disable this service. If you print, make sure you leave it as automatic.

Remote Registry: This service allows remote users to modify the Registry on your computer. If you are not on a network, you can disable this service.

System Restore Service: This service allows you to use System Restore. If you have turned off System Restore anyway, you do not need to turn off the service. If you do, you turn off System Restore.

Themes: If you do not use themes, you can disable this service.

Windows Image Acquisition: If you do not use scanners or digital cameras, you can disable this service.

Wireless Zero Configuration: If do not use wireless networking devices, you can disable this service.

You may have a number of other automatic services, depending on software and other configurations on your computer. So it's a good idea to look through the services and learn more about them. If you double-click a service, a Properties dialog box appears

Notice that on the General tab, you see a Startup Type drop-down menu. If you want to change an automatic service to manual, select Manual here and click OK. As a general rule, don't disable a service unless you are sure you will never use it. However, manual configuration allows the service to be started when you find it necessary, thus speeding up your boot time.

However, before you change a service to manual, look at the Dependencies tab (see Figure 4-4). This tab shows you which other services depend upon the service you are considering changing.

Keep in mind that services are necessary for the vast functionality you get with Windows XP. Change only those services that you understand and do not use. How you use your Windows XP computer should be the best guide in terms of optional startup services.

Tip:

The Indexing service and the System Restore service take up a lot of disk space and system resources across the board. You can live without the Indexing service but I suggest that you keep using System Restore. It works great when you are in a bind and this is one case where the loss of speed may not be worth the ramifications of not using System Restore.

Speed Tips and Tricks for Windows XP Startup

Aside from startup programs, services, and the Prefetch folder, there are a number of other startup procedures and issues you can modify to help Windows XP start faster. The following sections explore those tips and tricks.

Manual IP Addressing on Small Office/Home Networks

Windows XP is configured to help you take care of networking. It uses the TCP/IP protocol for networking in workgroups, or what you might call small office or home networks that do not use a dedicated server.

The problem is that automatic IP addressing can be slow. When your computer boots, it has to query the network to see what IP addresses are already in use and then assign itself one. If you want to speed up the boot time a bit, consider manually assigning IP addresses to all computers on the network. This way, the network computers do not have to worry about locating an automatic IP address. Because one is manually configured, the
operating system doesn't have to spend time solving this problem.

This isn't a networking book, however, so I won't delve into the implications of using a manual IP address, but if you are using a computer that functions as a host computer to the Internet (using Internet Connection Sharing [ICS]), you can get into connectivity problems if you change the configuration of the IP address. However, you can still work around this problem by starting with the ICS host computer.

Select Start/Connect To/Show All Connections. Right-click your network adapter card
and click Properties. On the General tab, select TCP/IP in the list of services and click the
Properties button.

In the TCP/IP properties, you can see if you use an automatic or manual IP address. In the example in Figure 4-5, I have configured a manual IP address of 90.0.0.1 and a default subnet mask. The other computers on my office network each use a different IP address in the same class, such as 90.0.0.2, 90.0.0.3, 90.0.0.4, and so on. This way, each computer has a permanent IP address, which helps increase boot time. Note that if you change the IP addresses of your computers, they must all use the same subnet mask. A default subject mask of 255.255.255.0 will keep you in good shape.

Make sure you understand the implications of changing IP addresses on your network. If you have no networking experience at all, you may be wiser to leave the automatic IP addressing as is and try to gain some speed using the additional suggestions in this chapter.

Disabling Recent Documents History

Windows XP includes a feature that keeps track of all recent documents you have opened or used. The idea is that you can select Start/Recent Documents History and quickly reopen any document you have recently used. I use many documents each day and never

use the feature myself. In my opinion, I can keep up with what I want to use without
Windows XP doing it for me.

The bad thing about Recent Documents History is that Windows XP has to calculate what should be put there each time you boot Windows, which can slow things down. So, if you never use the Recent Documents History, it's a good idea to disable it. Here's how:

1. Open the Registry Editor (select Start/Run, type regedit, and click OK).
2. Navigate to HKEY_CURRENT_USER\Software\Mcft\Windows\ CurrentVersion\Policies\Explorer.
3. Create a NoRecentDocsHistory D_WORD key. Double-click the value to open it once it is created.
4. Set the Data Value to 1 to enable the restriction.
5. Click OK and close the Registry Editor. You'll need to restart the computer for the change to take effect.

Disabling the Boot Logo

You can remove the boot logo that appears when you start Windows XP. This little tweak probably shaves only a few seconds off your boot time but seconds count if you are serious about trying to get Windows XP up and running as quickly as possible. The only negative is that if you remove the boot logo, you will also not see any boot messages,
such as check disk. (But if you are not having problems with your computer, this isn't such a big deal.)

To remove the boot logo, follow these steps:
1. Select Start/Run, type msconfig, and click OK.
2. In the System Configuration Utility, click the BOOT.INI tab.
3. On the BOOT.INI tab, click the NOGUIBOOT check box option. Click OK.

Removing Unwanted Fonts

One trick that increases your boot time a bit is to lose any fonts in the Fonts folder in
Control Panel that you never use. The more fonts you have, the more processing
Windows XP has to do to prep all of those fonts for use. You must be a bit careful here to not remove fonts that you might want, but there is a good chance that you can live
without many of them. For instance, you may have foreign language fonts and other symbol fonts (such as Wingdings) that you never use.

To delete unneeded fonts, follow these steps:
1. Open the Fonts folder in Control Panel.
2. Select Edit/Select All and then Edit/Copy.
3. Create a new folder on your desktop, open it, and select Edit/Paste.
4. In this new folder, delete any of the fonts you do not want.
5. Return to the Fonts folder in Control Panel. Right-click the selected fonts and click
Delete.

6. Go back to your new desktop folder and click Edit/Select All.
7. Return to your Fonts folder and click Edit/Paste. You now have only the desired fonts in the Fonts folder.

Tip:
You can directly delete fonts from the Fonts folder without creating the secondary folder. However, I recommend the preceding steps to help ensure that you do not make a mistake in the deletion process.

Stopping Remote Assistance and Remote Desktop Sharing

In Windows XP Professional, you have two remote networking features called Remote Assistance and Remote Desktop Sharing. These remote networking features are very helpful in a variety of situations but if you don't use them, it is good idea to disable them to save boot time. You can always enable them later if you want to use them.

Note:
If you are interested in using Remote Desktop or Remote Assistance, see my book
Windows XP for Power Users: Power Pack published by John Wiley & Sons.

1. Open the Start menu, right-click My Computer, and choose Properties.
2. Click the Remote Tab.
3. Clear both check boxes to disable Remote Assistance and Remote Desktop.

Speeding Up the Dual-Boot Timeout

If you dual-boot your computer with Windows XP and another operating system, you see an operating system selection menu on startup. If you typically boot into Windows XP and not the other operating system, you can speed up the dual-boot timeout value so that you do not wait so long for the boot process to select your default operating system and continue with the boot process. The default timeout value is 30 seconds but you can change this setting to 10. This gives you enough time to select the alternate operating system if you want but also speeds up the boot process. You can skip this section if you do not use a dual-boot configuration.

Follow these steps:
1. Locate the boot.ini file on your computer. It is a hidden file by default; mine is located in C:\boot.ini.
2. Open the file with Notepad (which is what opens it by default).
3. Change the Timeout value to 10 (see Figure 4-11).
4. Select File/Save and close Notepad.

Speeding Up Your PPPoE Connection

If you use a Point-to-Point Protocol connection over Ethernet (PPPoE), you may notice a delay in using the PPPoE connection after startup. By default, there is a 120 second delay

but you can stop this behavior by manually configuring an IP address for the network adapter card. If you do not use a PPPoE connection, you can skip this section.

1. Select Start/Connect to/Show All Connections.
2. Open the TCP/IP properties for your LAN network interface card.
3. Manually set the IP address on the TCP/IP properties to an appropriate IP address and subnet mask for your network.

Reducing the Wait Time

When you start to shut down Windows XP, it has to quit, or "kill," any live applications or processes that are currently running. So close all applications first. However, some applications and processes are always running in the background. You can reduce the amount of time that Windows XP waits for those applications and processes to close before Windows XP kills them. Edit three different Registry settings to change this:

1. Open the Registry Editor.
2. Navigate to HKEY_CURRENT_USER\Control Panel\Desktop. Select
WaitToKillAppTimeout and set the value to 1000.
3. Select the HungAppTimeout value and set it to 1000 as well.
4. Navigate to HKEY_USERS\.DEFAULT\Control Panel\Desktop. Set the WaitToKillAppTimeout and set the value to 1000. Select the HungAppTimeout \newline value and set it to 1000 as well.
5. Navigate to HKEY_LOCAL_MACHINE\System\CurrentControlSet\Contro l. Select the WaitToKillServiceTimeout value and set it to 1000.
6. Close the Registry Editor.

Automatically Killing Tasks on Shutdown

You know the drill. You start to shut down the computer, you wait a few moments, and then you see a dialog box asking if you want to kill an application or service that is running. Instead of prompting you, you can make Windows XP take care of the kill task automatically. Here's how:

1. Open the Registry Editor.
2. Navigate to HKEY_CURRENT_USER\Control Panel\Desktop.
3. Highlight the value AutoEndTasks and change the value to 1.
4. Close the Registry Editor.

when you have done all the steps you machine will run faster and without
ANY errors !!.