Monday, November 19, 2012

How to Access All System Settings in Windows 8


When you want to access or change any settings in Windows 8, the best way is to access the Control Panel which is the main option available to access settings. But if you want to see all the available settings in one single view grouped by tasks, then here is a shortcut option. This option is generally termed as GodModein Windows. This mode enables you to access all the settings in one folder which can be created on desktop enabling quick access.
This mode is simply a shortcut to access all the settings in Windows without having to access Control panel. This feature will work in previous versions of Windows as well.
To get started, first create a new folder on desktop. Right click on desktop and select New Folder. Now name the folder as
All Settings .{ED7BA470-8E54-465E-825C-99712043E01C}
You can change “All Settings” in the name to any other name as well.
Description: GodMode Windows 8
Now press enter and you can see the folder created on desktop and this resembles the Control Panel icon.
Description: Settings
When you open this folder, you can see the complete list of settings grouped into different categories.
Description: GodMode in Windows 8
You can search the list of settings using the default search available. If, for any reasons, you are not able to create this folder, you can also try the free app MyGodMode to create one on Windows.


Getting Started with Windows 8 Start Screen


You can click and hold any tile and move it to rearrange the list, if you want tiles to be arranged according to your priority. You can right click on any tile and this pop ups a option bar at the bottom which has options to unpin the item from start menu or make it smaller in size (or larger) and also stop or start live updating.

You can select multiple tiles by right click and then remove all of them in one go. You can uninstall an app from the options, if you select the particular app alone.


 Certain apps installed on Windows and pinned to Start screen will need to be run under admin rights and such apps will have option to do so by right clicking on them and selecting it from the bottom options bar.
 Moving the cursor to the bottom right corner brings in the Charms, which is actually a quick access menu for search, share, devices and settings. You can also view the list of all installed apps on Windows 8, which includes apps not pinned to the start screen.
 Another neat feature of the start menu is that you can start searching for the app directly by typing from the start screen without having to open search.
From any screen or app, you can easily switch to start screen either by clicking the Windows Key on the keyboard or clicking on the bottom left corner.

How to Upgrade to Windows 8


Microsoft has launched Windows 8 and it is available for upgrade or download. Along with the release of Windows 8, Microsoft has provided an upgrade offer for existingWindows 7, XP and Vista customers, they can upgrade to Windows 8 for just $39.99. This offer is available only up to Jan 31st 2013.
T to upgrade to Windows 8 Pro, you must be running Windows XP with SP3, Vista or any version of Windows 7. The upgrade process is done by the Windows upgrade assistant.
Download the upgrade assistant, from here. And run it.


The upgrade assistant will check for compatible apps and devices. Once the report is generated, you can see the apps and devices which are compatible with Windows 8.

If you are upgrading from Windows 7, you have the option to keep files and apps while XP and Vista users does not have the option.

In the next step, you need to click Order button.
 

In the review order, you can additionally order a DVD for 1066 or go for online version alone.
 
You need to enter the billing address in the next step.
 
Now select the payment profile, you have the option to pay by credit card or PayPal account.
 
In the final payment profile, you need to confirm the order.
 
 
Once the payment is complete, you will receive the Windows 8 upgrade key and also by Email.
 
The set up will start downloading Windows 8, it will consume around 2GB of download.
 
Once the download is complete, it will make the files ready for upgrade.
 
You will have three options, 
1. Install Windows 8 now
2. Burn it to a DVD through ISO or a USB drive
3. To install later.
 
If you select Install now, the set up will continue with the upgrade process and you can follow the onscreen instructions and you can skip the rest of this tutorial. If you select create media, then you can select either USB or ISO image. When you create an ISO, you can specify the location to save the file and the set up will create it.
 
Finally when you have created the ISO, set up will once again show the product key.


How To: Backup, Save and Restore Windows 8 Activation Genuine Key After Re-installation of Windows

Well, the reasons for Windows going corrupt are many. Let us not dwell on them. The point is, if for any reason you want to re install windows 8 and don't want to activate it by internet or phone, then this is the article for you.


Prerequisite Instructions before Starting:
Users should remember that any changes in machine’s Hardware and Software are not allowed whatsoever.
Users can't activate one edition of Windows 8 thinking you can use the backup for another edition later. The activation is only applicable to your specific hardware and OS edition.

Users first have to re-install windows and then install their drivers first and then apply restoration method of Windows 8 Activation. You must install drivers before the restoration of Windows 8 Activation Genuine Key.


Step 1: Go to C:\Windows\System32\spp\ and backup the Store folder as this turned out to be the only folder you need to make backup of.

Note:
The store folder might be hidden, open up Folder options from Control panel and choose View tab, select Show hidden files and folders + uncheck Hide protected system files. You must verify that the store folder contains following files and folders:
1 file named data.dat which is hidden
1 file named tokens.dat which is visible
1 folder named cache containing a file named cache.dat
Step 2: Now Re-install Windows

Step 3: After Windows is re-installed I suggest running a new Command Prompt as Administrator where you need to type in slmgr -upk to uninstall the key so the status changes to Unlicensed

Step 4: After step 3 you need to reboot in Safe mode and easiest way is by using msconfig via Run. Choose the Boot tab and then Safe boot-Minimal, apply and restart when prompted

Step 5: After the PC has rebooted in Safe mode open a new Command Prompt as Administrator and type net stop sppsvc to stop the Software Protection Platform service (sometimes you can get a message that it's already stopped and not running)

Step 6: Go to C:\Windows\System32\spp\ and replace the current store folder with the backed up one (I just copied the folder and pasted over the old one replacing the files altogether)

Step 7: Go to Run and use msconfig and choose Normal boot under General tab this time, apply and click restart when prompted

Step 8: When restarted you can see that the watermarks are gone and by checking the usual slmgr -dli/dlv/xpr commands in Command Prompt you'll see that it worked and you're activated + by checking the Volume Activation Management Tool 2.0 you'll see License Status: License renewed and Genuine Status: Genuine. Congratulations!! Your Windows 8 copy is now Activated with Genuine Activation Key and you have successfully completed the restoration method. Enjoy!

Note : It will not increase the 180 days you get with your KMS activation (if you are on that). This reactivation works within 180 days. After 180 days you have to find another server to get extra 180 days.

Sunday, November 4, 2012

How To Enable/Disable Hibernate Mode in Windows 7


How To Manage Hibernate Mode in Windows 7

If you don’t use the Hibernate option in Windows 7, you can save some disk space by disabling it. Here we will look at a few different ways to manage hibernate options in Windows 7.
Note: Hibernate mode is not an option on systems with 4GB of RAM or more.
Enable or Disable Hibernate Through Command Prompt
Using the Command Prompt might be the easiest way to enable or disable Hibernation. Click on Start and type CMD into the search box and it will be listed under programs. Right-click on the icon and select Run as administrator.
6hi
The Command Prompt opens and you will use the following to enable Hibernation.
powercfg /hibernate on
Type in the following to disable hibernation.
powercfg /hibernate off
Manage Hibernation Through Control Panel
Click on Start and open Control Panel then click on Power Options.
On the left side click on Change when the computer sleeps.
Now click on Change advanced power settings.
In the Advanced Power Options window expand the Sleep tree then expand Hibernate afterand change the minutes to zero to turn it off. Or you can specify the amount of minutes you want to pass before it goes into hibernation. After you’ve made your selection click Apply and Ok then close out of the remaining screens.
Where is Hibernate?
What if you try the command line option to turn it on and Hibernate mode still isn’t available? Then what you’ll want to do is disable Hybrid Sleep by expanding Allow hybrid sleep and turning it Off.
Now you should have Hibernate and Sleep as part of the power options in the start menu and will also be an option when you hit Ctrl+Alt+Del.
Disable Hibernate Through Regedit
Note: Changing registry values can cause your computer to become unstable or stop functioning and is only recommended for experienced users. 
Now that the disclaimer is out of the way…you might want to completely disable Hibernate mode through a registry edit. Open the Registry and browse to HKEY_LOCAL_MACHINE \ SYSTEM \ CurrentControlSet \ Control \ Power and change both HiberFileSizePercent andHibernateEnabled value data to zero. After you’ve made the changes close out of the Registry Editor and restart the machine.
If you always turn off your computer or never do, you can disable the Hibernate mode to gain a bit of extra hard disk space. On our Windows 7 (32-bit) machine with a 300GB hard drive, disabling Hibernation gained us just over 3GB of more disk space. That may not seem like much especially with today’s high capacity drives, but if you don’t need Hibernation, why not reclaim that space?

Saturday, November 3, 2012

How to find the list of installed updates in Windows 8


Microsoft and other related apps releases quite a lot of updates to your PC, these might be feature enhancements or improvements or bug fixes. Generally Windows will let you know when updates are available for your PC and prmopts you to install them. Now how do you check if an update is installed on your PC?

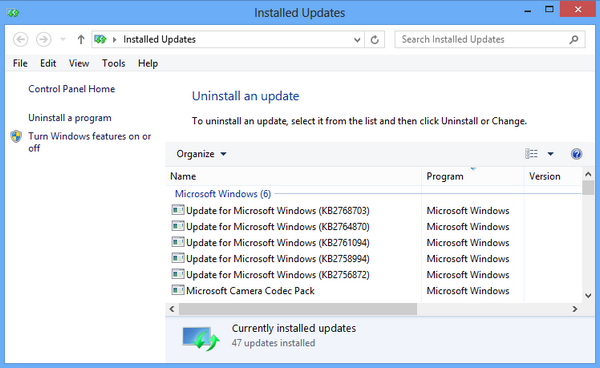
For this there is a dedicated section in Control panel to view them. So in case you want to access this, you need to open control panel and then navigate to installed updates. There is quick shortcut to access the installed updates, as mentioned by TheWindowsClub.

Open the run command (press Win+ R key) and type C:\Windows\explorer.exe shell:::{d450a8a1-9568-45c7-9c0e-b4f9fb4537bd}. Now press enter and this will open the installed updates center in Windows.

Here you can see all the installed updates for Windows and other related apps for which update was issued by the developer.


Installed Updates

Wednesday, October 31, 2012

How to Add a PowerPoint to Blogger


1. Open Microsoft PowerPoint. Create the presentation that you want to embed on your Blogger account. Save it to an easily accessible location, such as "My Desktop" or "My Documents."

2. Open an Internet browser window and create an account on Scribd.com. Find the "Sign Up" button in the upper right hand corner. You will need an email address, username and password.
A Scribd account allows you to make friends and host or publish documents online. The Scribd account will host your PowerPoint presentation. You can also sign up for a Scribd account through a Facebook account.

3. Sign into your Scribd account. Click on the "Upload" button at the top of the page. Choose to upload a single file, instead of a group of files.

4. Type in your email address, when you see the screen that says "Wait! Your document isn't published yet." The email address is required for legal reasons. Click "Send" to publish your document.
Type in a description of your PowerPoint at the bottom of the Publishing page, if you want to. This is not required, but you can create tags and categories, if you want to share it on Scribd.
                               
5. CLick "Save Changes" and you will be taken to the "Share your documents" page. Find the "Embed Code" near the bottom of the page. Uncheck the box that says to include a link to the file at the top of the code and press the "Copy" button to copy the code.
There are 2 elements to this code. The first "Object" tag tells an independent webpage how to post a presentation. The second "Embed" tag tells how the presentation should be embedded in another program, such as Blogger.

6. Open another Internet browser tab. Sign into your Blogger account.

7. Create a new post on your Blogger site. Type the title of your PowerPoint post.

8. Place your cursor in the post box and paste your Scribd code. If you are using an Apple computer, press the "Command" and "V" keys to paste the code. If you are using a PC, press the "Control" and "V" keys to paste the code.

9. Find the 2 parts of the code. The object part should start and end with angular brackets that look like "<" and ">" around the word "object." Delete this portion.
You should now only have the "Embed" element. It should begin and end with angular brackets around the word "embed."

10.Click the "Publish Post" button. Return to your Blogger site to the PowerPoint posted to your homepage.